Showing posts with label Nail Art Tutorial. Show all posts

Sep 30, 2012

Zebra Swimsuit Nail Art Tutorial! =)

Hello, my lovelies!

Here is the tutorial for my latest nail art! Enjoy :) 

1. Apply a base color of your choice! 
2. Tape your nail off diagonally and paint the nail with a white polish. If you don't want to use tape, no problem! The line doesn't have to be perfect, cause it'll be covered up anyway ;) Just use a nail art brush and freehand it!
3. Paint the zebra print with black ... or you could do a leopard print as well! ;)
4. Now take a thin nail art brush and paint a thin line with a sparkly color that matches your design along the white part of your nail. 
5. Let it dry a little bit and add a top coat of your choice! And you are done :) 

Pretty easy but so eye-catching! You could do many different designs on the white part though! Leo print, dots, stripes ...you name it! :) 

Here is a pic of the end result again (sorry for the tip wear, but I wore it for 3 days now!)


I hope this tutorial was helpful to some of you! :)
Have a nice weekend! :*

May 6, 2012

French Poppies Tutorial !

Hello!
Why is the weekend always so short ?? I hate that :P
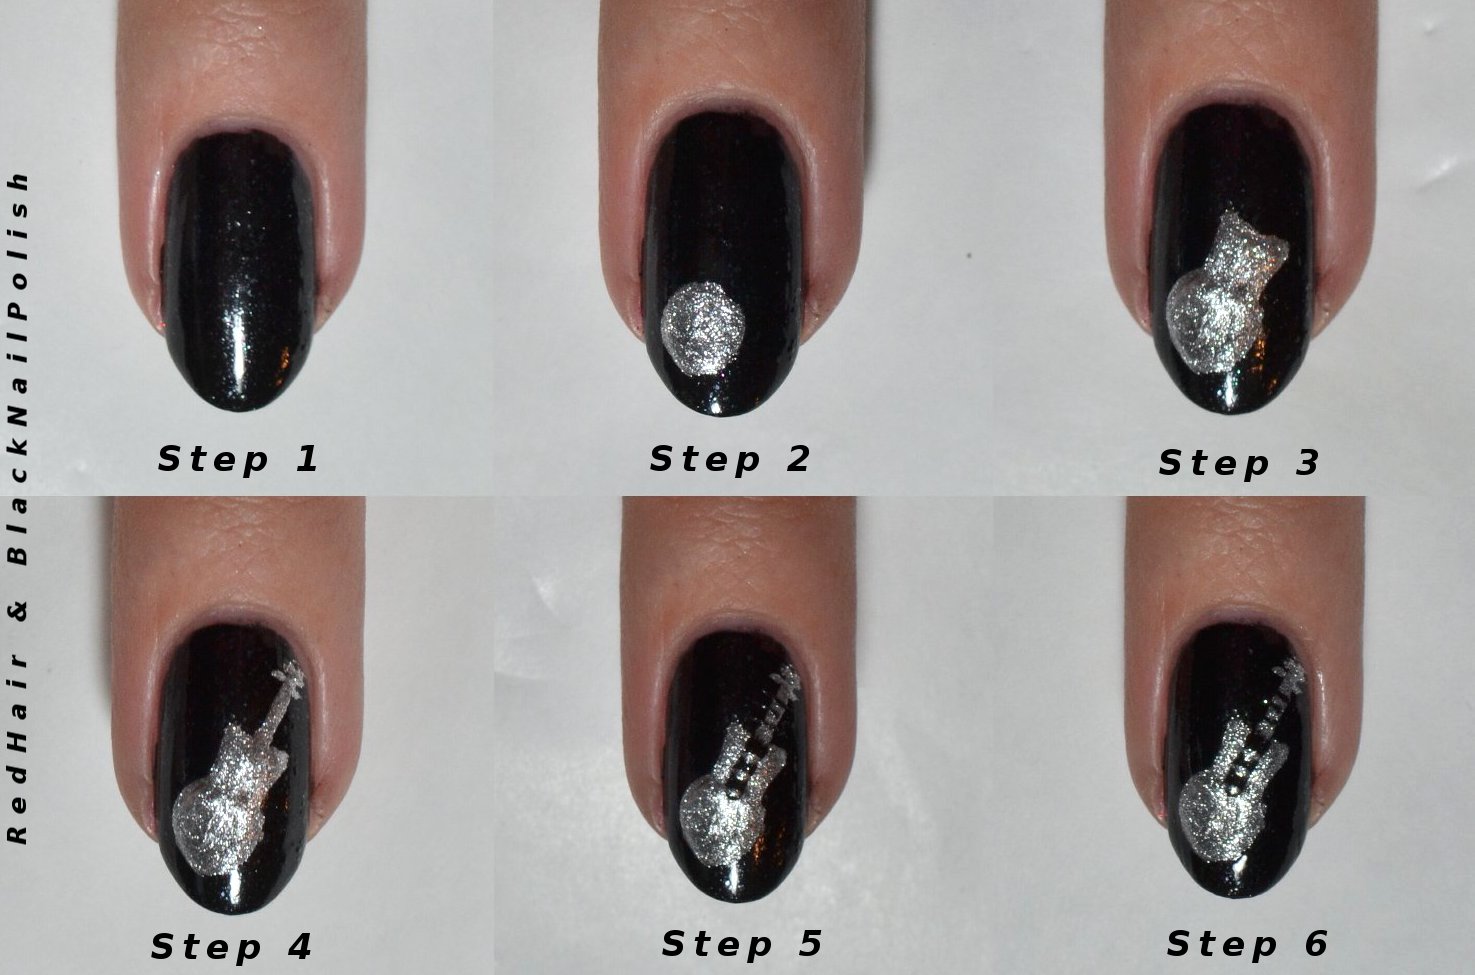
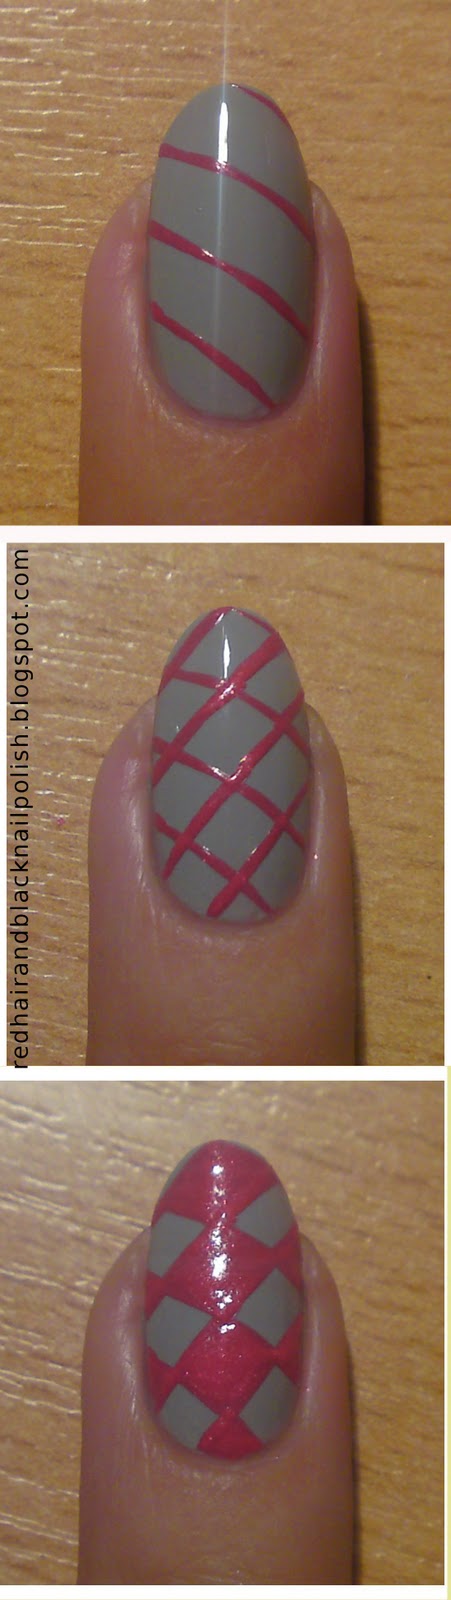
I have another tutorial prepared for you today! Wait a minute ... 2 tutorials in a row?! Whoa! Now everybody who requested tutorials should be happy :D Let's see what we need for this manicure:
A dotting tool, bobby pin or tooth pick and one of this wider Nail Art brushes.If you don't have such a brush, I bet you could use the brush from the polish, since the flower we're doing is big and doesn't have to be perfect.
Let's start with the step-by-step tutorial!
1.) Apply the base of your french, a nude or clear polish, or nothing at all. Just do it, how you prefer it. I used 2 coats of O.P.I. Nail Envy.
2.) Do the french tip with a white polish. If you don't know how to do this step, I'm sure you find some tutorials on Youtube on how to do a french mani ;) I made mine a little bit to thick, but we cover up more than a half of it, so it doesn't have to be perfect! :D
3.) Now take the wide brush and a red polish and do the first petal of the flower. I like to start with the middle one, but you can also start at the side. Do it a bit diagonal and messy! The petal doesn't have to be perfectly round or with straight lines!
You get the hang of it after a few times ;)
4.) Now do the other 2 petals on the sides. To create the petal I kinda dab the brush onto the nail. The wider your brush the bigger the petals!
5.) After doing the same thing one more time, the red blobs start to look like a flower right? :D
6.) The red I used wasn't very opaque so I added another coat of red polish.
7.) Now add a green blob at the center of the flower, using the brush of the polish or a dotting tool.
8.) Add some random brown spots with a dotting tool ...
9.) ... and some black dots.
10.) As always, finish off the design with one coat of TC and you're done! ;)

Actually you could skip step 7 & 8 and just add the black dots, it would have the same effect. :P 
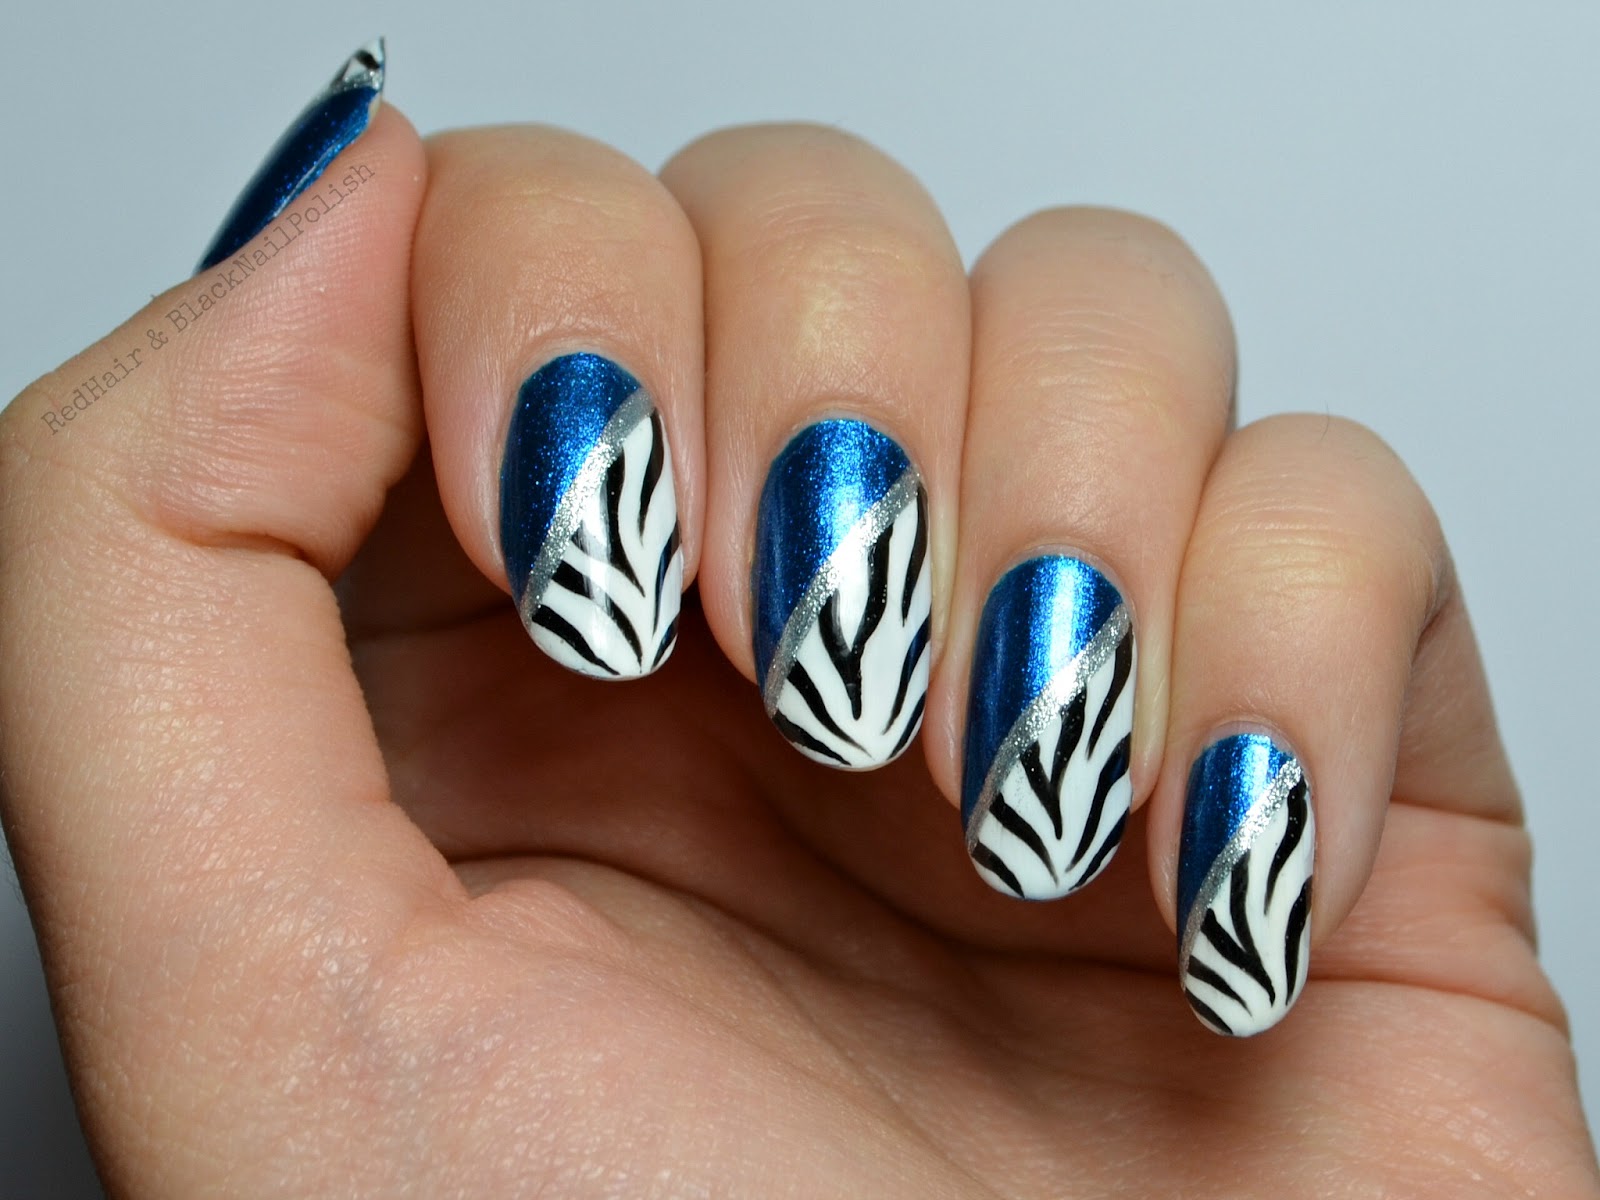
You can do this as an accent nail or as a full mani, like I did: 

Tomorrow I have something exciting to show you! Well, at least it's exciting for me :D 
Thanks for reading and have a good night! :* 

How to apply Water Decals !

Hello, my dear followers! 
Here is the promised tutorial on how to apply Water Decals :) Let's start:

1.) Take the sheet with the decals and cut out as many pieces as you want to use for your manicure. Make sure to remove the clear foil covering the sheet. 
2.) Fill a little bowl with water and put the pieces you cut out earlier in there.
3.) Now you can polish your nails with a color of your choice, while you wait for the Decal to come off the paper. After 5-10 minutes take some tweezers and take out the paper with the image on it. You can use your hands too of course :P 
4.) With your finger, slightly slide of the image from the paper. If it doesn't work, put it back in the water for a few more minutes. 
5.) Now you can place it on one of your nails. Don't worry, you don't have to place it perfectly because you can move it around, while it's still wet. :) 
6.) I didn't place it as near to the cuticle as I would like, so I just used my finger to put it in place. Like I said, as long as it's wet you can move it around on your nail. Make sure that your polish is almost dry before you apply the Water Decal, so that you don't mess it up :) 
Add 1 coat of TC and you are done!

Pretty easy right?? :D 
Here is my end result again: 

As always I hope it was helpful and see ya tomorrow with the french poppies tutorial! ;) 

Good night blogging-world!

Apr 23, 2012

Black Widow Tutorial

I went with Black Widow, because it just sounds cool :D Thank you my dear followers on facebook for this suggestion! ;)
Let's start directly with the tutorial, shall we? 
Step 1: 
Apply a base color of your choice.
Step 2: 
With another color, paint a vertical line on the middle of your nail. It doesn't have to be perfectly straight, because we will even it out in the next step! :)
Step 3:
Take a third color and a thin nail art brush and paint 2 lines along the middle stripe. Now these 2 have to be as straight as possible. Maybe you can use some tape if you don't think you can do it freehand.
Step 4:
With the same color as before, paint 3 or 4 stripes on each side at any angle you like. Finish it up with a coat of TC and you are done! Easy peasy, right? ;) 

You can do this as an accent nail or as a whole manicure like I did yesterday. 
Here is the end result again: 
The cool thing is that you can do this in any color combination you like! :) 
Seeing the close up pics for the tutorial I just had an idea: Should I include such a big close up pic for swatches? It's easier to see all the details, right? :) Let me know what you think!

Thanks for reading and I hope it was helpful! :)   

Apr 14, 2012

Music Notes Tutorial !

Hey there! :)
How are you all doing? Enjoying the weekend? I know I do, because I'm also on vacation now for one week, yay! :D As promised, here is the tutorial for yesterday's mani! I got inspired by Anutka from Wacky Laki, who did an amazing tutorial, so I decided I'll do the photos all in one, like she did. Hope you like it!
Steps:
1.) Apply a base color of your choice, preferably something dark.
2.) Take a lighter color, to have a good contrast and apply a blob of polish in one of the corners of your nail. Use a dotting tool or a toothpick to create a big circle.
3.) Now attach a square to the circle and smooth out the lines between these 2. Hard to describe this step :P
4.) Do a straight line which represents the guitar neck. At the end of it you can do some tiny lines to create the headstock.
5.) To continue the finger board on the guitar body we take the color we used as a base and do a line halfway done the guitar body. Last step: paint some really thin lines along the fingerboard (in silver on the body and black on the neck) Oh god, I hope you know what I mean :D
6.) Final step: Top Coat it! And you're done with the accent nail :)
Steps:
1.) Apply a base color of your choice, I used a plain white and pimped it with some flakes.
2.) Take a small Nail Art Brush and do 4 (or 5) horizontal lines with a black polish.
3.) Now you can place the music notes wherever you want! Use a dotting tool (or the round end of a bobby pin) and do 2 or 3 dots on the lines or between them.
4.) Paint some vertical lines on each dot! They start to look like music notes, don't they? :)
5.) Now you can connect them or do 2 separate notes. Just do it how you like it! Google "music notes" if you want some inspiration ;)
6.) Top Coat it with a thick layer of TC and you're done!

Whew, we are done! :) Here is the end result again:
I hope this tutorial was helpful and as always: if you decide to try it, send me an email with a pic, I love to see your recreations ! ;) 

Thanks for reading! See ya soon :)

Nov 5, 2011

Nail Art Tutorial: Random Dots & Stripes

Hello everybody!
It´s Saturday! How is your weekend so far? :) I have a new nail art tutorial for you guys! :DLet´s start !
Step 1 : After applying your base color (I chose black and silver to have a better contrast), take a small brush and start painting random stripes. You can start at the base, or at the tip ... it´s totally up to you :)


Step 2 : Since it´s random, the lines can be straight, round or wavy. I like to alternate the stripes a little bit :)


Step 3 : Basically you can paint as many stripes as you wish, but keep in mind, there has to be some space left for your dots! :)


Step 4: After you´ve finished your stripes place some dots along them. Alternate smaller and bigger dots to make it look more random :)

And that´s it! Pretty simple right ? It´s a great design for beginners, because you can do what you want...just go crazy with your dots and stripes :D


If you wanna make it look more fun, you can use more colors for the stripes/dots. I did my nails both ways, so you can see how it looks.
I could use that as a full manicure as well :D  
I love this Nail Art, because you can´t do anything wrong with it ;) 
If you recreate this design, I would love to see it ! :) 
(Btw: You don´t have to have a blog to show me your recreation....just send me an email with your picture:) If I get a few, I could do a post on them! Sounds like a good idea, right? Let me know what you think!)

Thanks for reading and have a great weekend! :-* 

Oct 30, 2011

Nail Art Tutorial: Butterfly Wings

Heeey!
How are you all doing? I´m a little late with the tutorial, but all of my plans for the day were messed up by one package... I will tell you about that another time ;)
Let´s get started!
 Step 1 : After applying your base coat and your base color of your choice, draw a rounded line on the right or the left side near your cuticles. Draw another line like that, but this time near the tip of the nail. The more further away the line is from the other one, the longer are your "wings".


Step 2 : With the second set of stripes we are connecting those two lines we draw before and defining the wing a little bit more :) I like to do 3 stripes to have 4 colored parts, but you can do more or less :)


Step 3 : Now the end of those colored parts (I will name them petals now :D) are to cornered, so we have to round them. I start from one side of the petal and draw a round line to the center of it and then do the same thing on the other side. I hope I described it good enough :P


Step 4 : Fill in the tip of the nail with the same color you used for the lines.
Basically you´re done with the hard part ;) Now comes the fun! ;)
Step 5 : Dots !! I just love them :D Start the first line of dots between the petals. Use a white polish for this to make a really good contrast :)


Step 6 : Do the second line of dots between the other dots, I don´t know how to describe it, but I think you get the idea from the photo. :)


Step 7 : Just place the dots til the end of your nail. You could do more or less dots, that´s up to you! :)


Step 8 : Finish it off with a TC and you are done !


This design takes some time, but it´s totally worth it ! You can experiment with some color combinations, maybe a gradient under the black polish .. just be creative :)

And here´s a example, how the end-result can look:
(the picture is from one of my previous posts)
I hope it was helpful to some of you, and if you recreate this design, let me know in your comments ;) 
Have a good night and sweet dreams! :-*

Oct 23, 2011

Nail Art Tutorial: Spider Web

Good evening everybody! :)
How was your weekend? I hope a little bit more spectacular than mine :P I learned the past few days for my upcoming test and now I found the time to post my weekend tutorial for you ;)

Btw: I now have a facebook-page! So if you´re on facebook, go ahead and like it! :D And I wanna ask you guys, whether you know, how to put the facebook box on my blog´s sidebar. I tried the HTML-Code, but it didn´t work :( So if you know how it works, just write me an email ;)

So, this time we have the Spider Web! Since Halloween is coming up, I thought I do some Nail Art for it :) It´s really easy and fast, and here it goes:

Step 1 : After applying you base color, you take a small brush and choose another color for the spider web. The colors should have a good contrast :) Basically you just have to paint some straight lines, that all start at the same point. I chose the right side by my cuticles as the "starting point".


Step 2 : It should look like this after painting on your lines. You can do more lines, for a denser spider web, or less, for a big spider web. I chose 4... I think it´s just the perfect amount of lines :)


Step 3 : Now we have to draw on the other lines, to make it look like a web. You could do some round lines, from one side of the nail to the other one (and it´s a lot easier that way), or you could do the lines a little bit curved from one line to the other. Does that make sense ? :D It´s like you painting a little "u" between every line.


Step 4 : Finish it off with a TC to make it shinny and you´re done! You have a spider web on your nails! :D (I didn´t put a TC on cause I added something else :P)


Phheew, I sure said the word "line" a lot :D


I didn´t do the web on all of my nails, just on the thumb and the ring finger. Then I thought I could add a cute little spider to one of my nails and here is the end-result:
 I also added some glitter over the spider-web, cause I loooove glitter! :) But this step is totally optional ;) 
I used: P2 - Dramatic Black (base on thumb and ring finger), S-he 471 (silver), Farmasi - 79 (silver glitter) and Essence - Fatal for the Spider. 
I am in love with this cute spider and his web!
Do you like it? 
I think I will do some more Halloween Nail Art the next couple of days ... this mani just got me in the mood :D
Have a good night and thanks for reading! :-* 

Oct 15, 2011

Nail Art Tutorial: Argyle Print

Hey, my dear readers!
Hope you are having a great weekend so far ;) Mine isn´t that good, cause I´m sick and I sit in bed all day, but that means I can do a little more for my blog ;) So here is another tutorial for you guys and it´s the Argyle print I showed you once on my Nail Art wheels :) Let´s start!

Step 1 : After applying your base coat and your base color, start off by painting diagonal lines all over your nail. The space between the lines will determinate the size of the argyle print, so paint more lines for a small print and fewer lines for a bigger print.


Step 2 : Now do the same thing from the other side ;) Little tip: If it´s hard to draw a continuous line, just start the line at the edge of your nail and draw it to the middle of the nail and then start from the opposite site and draw the line to the middle til they lines meet. Did that make any sense ? :P


Step 3 : Now that you have your net, you have to fill in some of the rhombs ( is that the correct word? I don´t trust google :D ) I did this with a small dotting tool, to make it a little easier. :) You already have a argyle print now! Let´s move on to decorate it a little bit more ;)

Step 4 : Now grab another color (preferable one that makes a contrast to the ones you used before) and draw some thin lines parallel to the ones you drew before. Hard to explain, but you get the idea from the picture ;)


Step 5 : Do the same thing from the other side :)  You could stop here and have an cool argyle print or you could take one more step ;)


Step 6 : As I said, this one is optional, but I like it very much :D In every spot, where the thin lines meet, you can add some rhinestones in the same color as the lines. Doesn´t it look awesome? :D


It takes some time to achieve this design, that´s why I did just an accent nail with it :) So here is the end result:
Do you like it ? I really hope this tutorial was helpful to some of you guys! :) I really like doing this tutorials and enjoy it even more, when I know I helped someone achieve the looks they wanted :)

Have a wonderful rest of the weekend and good night ! :-*

Oct 1, 2011

Nail Art Tutorial: Dots and Dots

Hello, my dear readers!
It´s Saturday and as usual, here is another tutorial for you :) I saw this design on youtube, so go and check out the video tutorial if you like ;)  It´s very easy to do, so let´s get started!


Step 1:  You will need a total of 3 color for this design, I used: Essence - You belong to me (base), Essence - White Hype and Essence - Trust in Fashion. After applying your base color, grab a small Nail Art brush and draw some lines with the other 2 colors. I can fit only 3 lines on my nail, but you can draw 4 lines if you want to :)


Step 2: Now grab a dotting tool and make some big dots along the lines. My white polish was a bit thick, so the dots aren´t that perfect and round as they should be :P While placing the dots, make sure to leave enough space between them, so that the dots on the other line can fit in the gaps :)


Step 3: We´re almost done! :) Just put some smaller dots inside the big ones, with the other color you used for the lines. Let it dry a bit and finish it off with a TC.


In the end it should look like this:
I hope it was helpful and let me know if you try it ! :) 
Have a great weekend! :-* 

Sep 24, 2011

Nail Art Tutorial: Abstract Squares

Hello everybody!
Man, I´m bad at finding names for my designs :D Anyway, here is another tutorial for you guys, and it´s very simple ;) I started off with 2 coats of Flormar - 50, a really gorgeous metallic green. It´s so hard to catch the color in the photos, I think I took over 30 pics and not one was even near color accurate. So I just edited one of them, and here it is:
It´s beautiful! And the application was a dream :) I could have used just one coat to make it opaque, but I wanted to be sure ;) In the next pictures I didn´t edit the color, cause it was to time-consuming. Huge difference, isn´t it ?
First step: Take a small Nail Art Brush and a color of your choice and draw some lines and squares. Do different sizes, so it seems more random. Now let it dry a bit and in the meantime you can choose another color to work with :)
Clean your brush or take another one, and do the same thing you did before, with your second color. Overlap the lines you did before and draw new squares, it´s up to you how many. Now if you overlapped some lines more than once, you can take your first color again - here it´s the black - and paint over the white line, so that it seems a little bit 3D. I did this on my ring finger, at the tip, but it´s not very visible. Does any of this explanation make sense to you ? I hope so :P Once your done, let it dry for a minute and finish your manicure with a TC. 
I hope this tutorial was helpful and let me know what you think about it ;) 
Thanks for reading and see ya next time! :-* 


Sep 17, 2011

Nail Art Tutorial: Funky French with a Swirl

Hello my lovelies!
In my last post I showed you guys my NA wheels and I asked you to choose some designs, I should do a tutorial for. The conclusion is, you wanna see tutorials on all of them :)) Well, that was my plan anyways and someone suggested the idea, that I also had in mind: to do a Tutorial Day, every week. :) So from now on, you will get a tutorial every Saturday :) Sounds like a plan, right? :)  I hope your happy with this decision ;)

So let´s move on to the tutorial! This one was asked by 2 of my dear readers and I like it as well, so I decided to do that first :)
Step1: Paint your nail with a base color, I chose Essence - Ahoy to create a good contrast to my second color, P2 - Open your Heart. With this one you paint a curved line on the tip of your nail.  
Step2: Take a small Nail Art brush and paint a thin line near the base of the nail, approximately parallel to the curved line on your tips. For this one, you can take a different color, than the one you used on your tips..it´s up to you ;) 
Step 3: Again with a small brush, you first paint a curved line on the side of your nail, then a straight line, which is finished with a swirl. Gosh, it´s harder to explain than to do :D I hope you get the idea, from the pictures ;) 
Step 4: Finally the fun part: dots! :) Take a dotting tool, and put some dots along the lines. If you did the tip and the other lines with only one color, you can do the dots in another color, just to mix it up a bit :) And you´re done! Not so hard, was it ? :)
Actually I like the result on my wheel much better :)) I think because the lines are thicker and I only used 2 colors. I put the 2 different results together, so you can see how it looks with 2 or 3 colors :) 

And I also dyed my hair! Yey, no more weird colors on my head :D This picture is taken in sunlight, but my hair is actually a little bit darker :) For those who wonder what color that is, it´s Wellaton - Colorado Red 8/45
I hope that tutorial was helpful to some of you! Have a great weekend! :-*

Aug 23, 2011

Nail Art Tutorial: Zipper Zebra

Good morning, my dear readers! :)
I just woke up and thought: let´s do another tutorial! :P The Zipper Zebra Manicure was on the second place in my poll and it´s my favorite, so here it is!
 
Step 1: Apply a base color of your choice, best would be a light color, to create a good contrast to the zebra pattern. I used 2 coats of Essence 50´s LE - Ahoy! 
Step 2: Cut a piece of scotch tape in a triangular shape and put it on the tip of the nail. Make sure the polish underneath is completely dry! The tape is hard to see in the pic, but I think you get the idea ;) 


Step 3: Now cover the whole nail with another polish of your choice, I used Essence - Purple Diamond. 1 coat should be enough, especially over a white or a light base.
Now to the fun part: remove the tape slowly, while the polish is still wet!
VoilĂ¡! It´s not a problem, if the lines are not perfect, cause you will cover them anyway :)
I don´t know how I managed to make this dent in the polish, hm..weird :P
Step 4: Now take a tip painter or a small brush to make some thin lines. A black polish is the best choice for this step, but you can be creative ;) First outline the triangle and then draw a straight line to the base of the nail. Basically you have to paint a "Y" on the nail :)


Step 5: This step can be done in many different ways. You can leave the plain polish to have a simple zipper mani, you can do a zebra pattern or a leopard pattern or just dots. Just do it the way you want it :)


Step 6: Last but not least: put some dots along the "Y" - shaped lines to make the zipper look more realistic. If you drew the lines to thick, the dots won´t show that good, but hey...practice makes perfect ;)


That´s the final result :) Have fun recreating this look and let me know in your comments how it worked out for you! :)
Have a nice day! :-*

Aug 14, 2011

Nail Art Tutorial: Abstract Flowers

Hello my dear readers! :)
The day started just right, with a lot of sun and a lot of degrees :D I hope you all have a very sunny Sunday too ;) So finally I have the promised Nail Art Tutorial for you! At first I didn´t knew how to take photos of all the steps and how to post them, and I will have to figure that all out til my next tutorial, but for now it looks like this. So please bear with me, after all it´s my first tutorial. :) Let´s start:
The first step is applying a Base Coat of course, and after that you apply the base color of your choice :) I went with the same colors as last time, so I used 2 coats of Essence - Ahoy, a nice white polish.
Now to the fun part: Use a tip painter or a small brush to paint the flower patels. Start with the middle one and add one flower patel on each side. Just begin on the left side of the nail and paint a slight ovally line. Keep in mind, they don´t have to be perfect! :)
Now with the same technique, you draw one line in each patel with a different color. I used the silver tip painter from Essence.  (sorry for the blurry image^^)
And again: draw one line in each flower patel with a third color of your choice, I used the pink tip painter from Essence :)  Now the right part of the nail is a little bit empty. Just add some random stripes with your third color. But not to many, cause there still has to be room for some dots. :)
As mentioned, grab a dotting tool and put some black dots along the lines. I used the same black polish, that I used for the flower patels. Clean up the dotting tool and add some silver dots on the base of the flower, just to cover up the messy lines and to make the flower look more realistic :) 
The last thing you have to do, is to add a TC to smooth it all out and to make the polish last longer. ;)
And then you´re done! This is the end result and as you can see I alternated the position of the flowers. But you can do them all on the same side...just do it how you like it :) Of course you can experiment with other color combinations! :P If you recreate this design, I would love to see it :) Just leave me a link in the comment section ;)
I hope this tutorial was helpful, and I promise I will do it better next time, with the pics and the explanations and all that :D Have a nice Sunday evening and see ya next time! :-*