
How are you all doing? Enjoying the weekend? I know I do, because I'm also on vacation now for one week, yay! :D As promised, here is the tutorial for yesterday's mani! I got inspired by Anutka from Wacky Laki, who did an amazing tutorial, so I decided I'll do the photos all in one, like she did. Hope you like it!
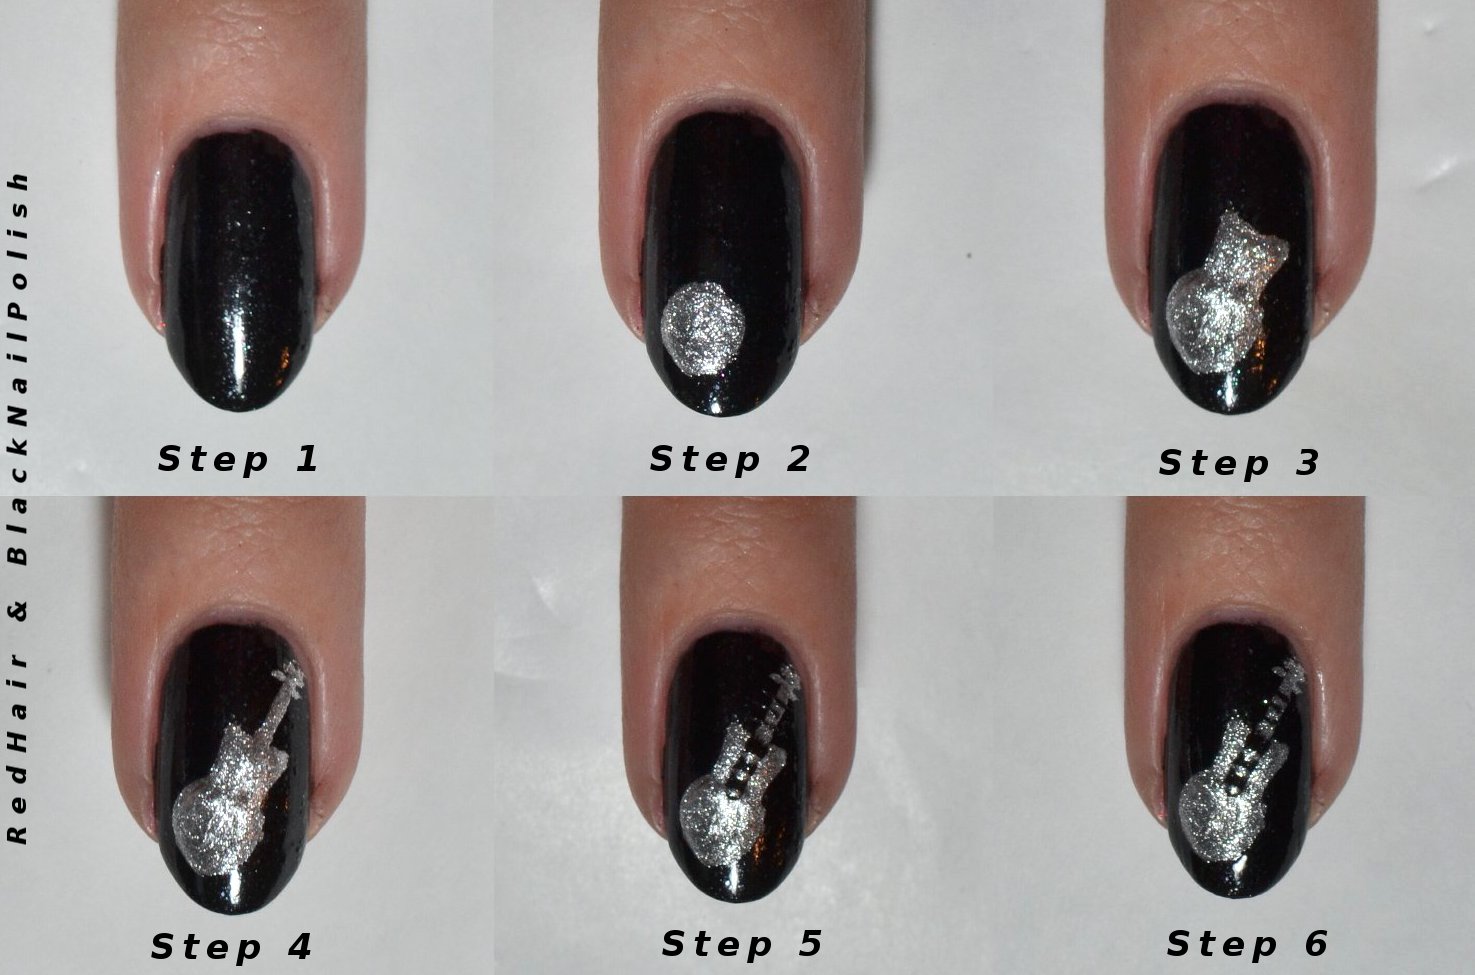
1.) Apply a base color of your choice, preferably something dark.
2.) Take a lighter color, to have a good contrast and apply a blob of polish in one of the corners of your nail. Use a dotting tool or a toothpick to create a big circle.
3.) Now attach a square to the circle and smooth out the lines between these 2. Hard to describe this step :P
4.) Do a straight line which represents the guitar neck. At the end of it you can do some tiny lines to create the headstock.
5.) To continue the finger board on the guitar body we take the color we used as a base and do a line halfway done the guitar body. Last step: paint some really thin lines along the fingerboard (in silver on the body and black on the neck) Oh god, I hope you know what I mean :D
6.) Final step: Top Coat it! And you're done with the accent nail :)

1.) Apply a base color of your choice, I used a plain white and pimped it with some flakes.
2.) Take a small Nail Art Brush and do 4 (or 5) horizontal lines with a black polish.
3.) Now you can place the music notes wherever you want! Use a dotting tool (or the round end of a bobby pin) and do 2 or 3 dots on the lines or between them.
4.) Paint some vertical lines on each dot! They start to look like music notes, don't they? :)
5.) Now you can connect them or do 2 separate notes. Just do it how you like it! Google "music notes" if you want some inspiration ;)
6.) Top Coat it with a thick layer of TC and you're done!
Whew, we are done! :) Here is the end result again:

I hope this tutorial was helpful and as always: if you decide to try it, send me an email with a pic, I love to see your recreations ! ;)
Thanks for reading! See ya soon :)
Very helpful and I might create this for hubby since he's a musician :-)
ReplyDeleteThank you! If you do, send me an email, please! :D
DeleteThanks for the good tutorial!
ReplyDeleteYou're very welcome! :D
Deletethis is a great way to do a tutorial. fool proof!
ReplyDeleteAll the photos in one looks great, and I love it when you do tutorials :-)
ReplyDeleteAw, thanks! I'm glad you like it :)
DeleteI love tutorials like this one. It makes it look a bit easier than when you just show the finished mani. :)
ReplyDeleteI'm glad it helps ;)
DeleteLoved the tutorial :-)
ReplyDeleteWhat are you going to do with your week of holiday?
Thank you!
DeleteI will probably sleep a lot =)) and prepare some things for the uni :)
awww. how cute are those nails!!! xo
ReplyDeletehttp://dejazu.blogspot.com/
Supeer! Multumesc tutorialul. (:
ReplyDeleteCu placere!! :)
DeleteCute! Great tutorial too!!(:
ReplyDeleteWhat a wonderful tutorial!! :D
ReplyDeleteAww, thanks!! :D
DeleteGreat tutorial! So cute :D
ReplyDeleteGreat tutorial. You should do more of them. :)
ReplyDeleteThank you! I'll definitely try ;)
DeleteUseful tutorial, thanks! :)
ReplyDeleteSuch a great tutorial :]
ReplyDeleteThis turned out great!!!!
ReplyDeleteWow!
Thank you so much!! :)
DeleteThis is crazy good, I love it and I love your tutorials! Please make more of them! =)
ReplyDeleteThank you!! I'll definitely try ;)
Deletecan the pics be borrowed??? like this one? I assume the blogger had your permission before using it??
ReplyDeletehttp://cutenailstudio.blogspot.in/2012/05/something-fun-to-do-with-kids-summer.html#more
They can be borrowed, but only after asking me!
DeleteShe didn't ask me, so I will write her a message.
Thanks for letting me know!! I appreciate it ;)