Oct 30, 2011

Nail Art Tutorial: Butterfly Wings

Heeey!
How are you all doing? I´m a little late with the tutorial, but all of my plans for the day were messed up by one package... I will tell you about that another time ;)
Let´s get started!
 Step 1 : After applying your base coat and your base color of your choice, draw a rounded line on the right or the left side near your cuticles. Draw another line like that, but this time near the tip of the nail. The more further away the line is from the other one, the longer are your "wings".


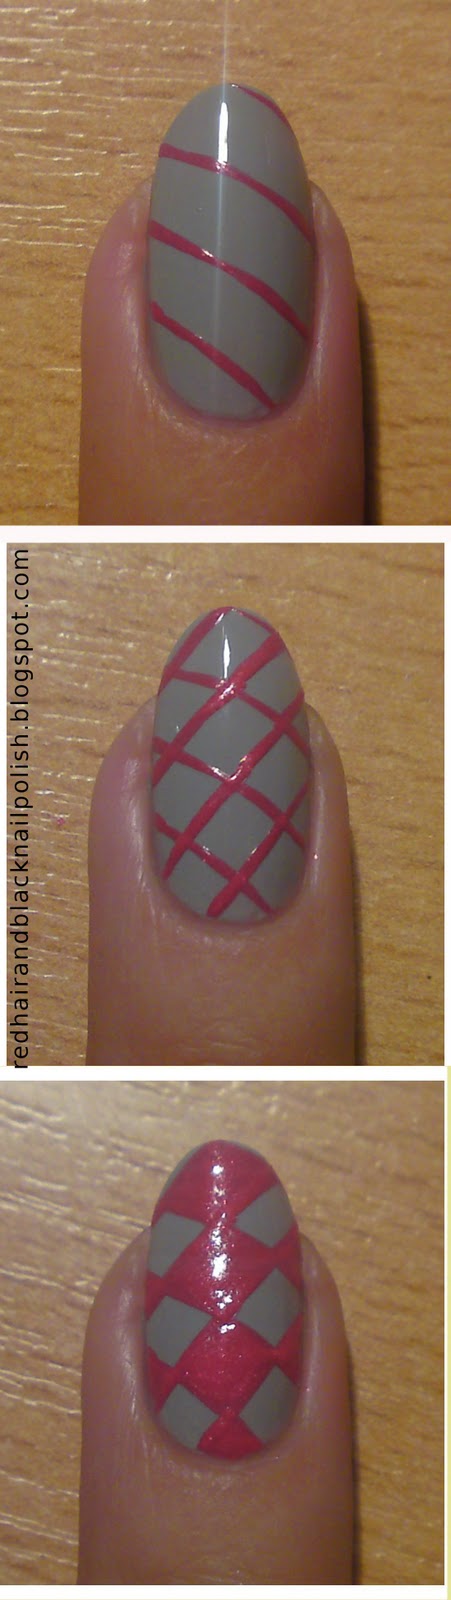
Step 2 : With the second set of stripes we are connecting those two lines we draw before and defining the wing a little bit more :) I like to do 3 stripes to have 4 colored parts, but you can do more or less :)


Step 3 : Now the end of those colored parts (I will name them petals now :D) are to cornered, so we have to round them. I start from one side of the petal and draw a round line to the center of it and then do the same thing on the other side. I hope I described it good enough :P


Step 4 : Fill in the tip of the nail with the same color you used for the lines.
Basically you´re done with the hard part ;) Now comes the fun! ;)
Step 5 : Dots !! I just love them :D Start the first line of dots between the petals. Use a white polish for this to make a really good contrast :)


Step 6 : Do the second line of dots between the other dots, I don´t know how to describe it, but I think you get the idea from the photo. :)


Step 7 : Just place the dots til the end of your nail. You could do more or less dots, that´s up to you! :)


Step 8 : Finish it off with a TC and you are done !


This design takes some time, but it´s totally worth it ! You can experiment with some color combinations, maybe a gradient under the black polish .. just be creative :)

And here´s a example, how the end-result can look:
(the picture is from one of my previous posts)
I hope it was helpful to some of you, and if you recreate this design, let me know in your comments ;) 
Have a good night and sweet dreams! :-*

Oct 27, 2011

Reader´s Choice: S-he 195

Hello my dear readers! :)
The awesome polish I will show you in a second, was chosen on Tuesday by an Anonymous reader, who chose number 211 :) Thanks for that, whoever you are :D Number 211 is S-he 195, a very sheer red glitter polish, which reminds me of Christmas :P I knew immediately what I would do with that polish, and here it is:
 BLOOD! :D Oke I know its Glitter-Blood, but still :P It´s perfect for Halloween ;) 
I used: Art de Lautrec 21 (black), P2 - Open your Heart and S-he 195. 
As I mentioned before, S-he 195 is very sheer, so I always use it as a glitter topper over a red polish.
In this second picture the red is color accurate :) There is so much glitter going on in real life, but I couldn´t capture it in the photo :(
Wanna know something funny? :D After I finished this manicure last night, I read some some new blog posts and I came across this manicure from Anutka. She did the same dripping manicure :D Cool coincidence, right? :P Make sure to visit her blog ;)

That´s it! Thanks for reading and have a great day .. I´m off to the Uni now ;)

Oct 25, 2011

Butterfly Wings

Hello, my lovely readers!
This post is scheduled, because I am at the uni all day and I don´t get a chance to post it otherwise :)
I wanna show you the manicure a wore for 5 days last week ! That´s a new record for me I think :D I didn´t have time to change it, but I also loved it so much, that I didn´t want to :P The other thing is ... it didn´t chip! After 5 days there was a little tip wear, but it wasn´t that visible.
Let me show you this beauty:
I love the red-shimmer! :D
 I used: Flormar U17, Essence Fatal, Essence White Hype.
I know some of you wanted a tutorial on this one, and I´ll post it this Saturday ;) 
And here is a pic of both hands, just because some people don´t believe I paint the designs on both of them :P 

And of course you can choose a number! Tell me one between 1 and 226 :D
Have a great day!! :-*

Oct 23, 2011

Nail Art Tutorial: Spider Web

Good evening everybody! :)
How was your weekend? I hope a little bit more spectacular than mine :P I learned the past few days for my upcoming test and now I found the time to post my weekend tutorial for you ;)

Btw: I now have a facebook-page! So if you´re on facebook, go ahead and like it! :D And I wanna ask you guys, whether you know, how to put the facebook box on my blog´s sidebar. I tried the HTML-Code, but it didn´t work :( So if you know how it works, just write me an email ;)

So, this time we have the Spider Web! Since Halloween is coming up, I thought I do some Nail Art for it :) It´s really easy and fast, and here it goes:

Step 1 : After applying you base color, you take a small brush and choose another color for the spider web. The colors should have a good contrast :) Basically you just have to paint some straight lines, that all start at the same point. I chose the right side by my cuticles as the "starting point".


Step 2 : It should look like this after painting on your lines. You can do more lines, for a denser spider web, or less, for a big spider web. I chose 4... I think it´s just the perfect amount of lines :)


Step 3 : Now we have to draw on the other lines, to make it look like a web. You could do some round lines, from one side of the nail to the other one (and it´s a lot easier that way), or you could do the lines a little bit curved from one line to the other. Does that make sense ? :D It´s like you painting a little "u" between every line.


Step 4 : Finish it off with a TC to make it shinny and you´re done! You have a spider web on your nails! :D (I didn´t put a TC on cause I added something else :P)


Phheew, I sure said the word "line" a lot :D


I didn´t do the web on all of my nails, just on the thumb and the ring finger. Then I thought I could add a cute little spider to one of my nails and here is the end-result:
 I also added some glitter over the spider-web, cause I loooove glitter! :) But this step is totally optional ;) 
I used: P2 - Dramatic Black (base on thumb and ring finger), S-he 471 (silver), Farmasi - 79 (silver glitter) and Essence - Fatal for the Spider. 
I am in love with this cute spider and his web!
Do you like it? 
I think I will do some more Halloween Nail Art the next couple of days ... this mani just got me in the mood :D
Have a good night and thanks for reading! :-* 

Oct 21, 2011

Reader´s Choice: Essence - Sundancer with a Gradient

TGIF ! Oh my god, I thought this weekend will never come :P Well, this was a looong week for me, that´s why I didn´t manage to show you the "Readers´s Choice - post" until now :)
So, on Tuesday the chosen number was 55 ! And it was chosen by Taya. Thank you! :) The polish behind this number is Essence - Sundancer, a beautiful yellow polish, that I already swatched -->here<--
Now I couldn´t leave it alone so I tried something I didn´t do before: a gradient ! :D But not a sponged one, no! I achieved this gradient, by painting the colors I wanted on the nails and quickly painting over them with a clear top coat. You know how sometimes the TC you put over your nail art design, smudges the colors, if they´re not dry enough ? Well I did that on purpose :P And here is the result:
All polishes are from Essence: Sundancer, Get the Fever (orange) and Love of Pink .
I just love this color combination! <3
Do you like gradients? Did you ever try this technique ? :) 

Thanks for reading
and have a great weekend, my lovelies! :-* 

Oct 19, 2011

Beauty Blogazon Roundup 9.10 - 15.10

Hello !
Enjoy this great posts my lovelies! :-* See ya later ;)


Beauty Blogazon Roundup October 9th -October 15th 2011


Red Hair and Black Nail Polish- Neon
Crackle
inspired by a Music Video

Bright Lights, Big Color- Get
It On


Nails and Noms- 31 Day Challenge: Day 1 (Red
Nails
)

The Style Page- It works ... it really works! (Mask Hair
Loss
)

Cosmetically-Challenged.com- Fabulous Shoe Finds For Under $50.00!
Women
Take Over the Oxford Style


Polish Pauper- What the?! Take Two! (Color
Morphing
)

Nailderella- Want a rainbow
on your nails?

Polish insomniac- PSA! Too Faced to come out with Nail
Polish
???

Beauty.Mark Style & Fashion-My Visit to the Daphne
Guinness
Exhibit at the Museum Of FIT

Glitter.Gloss.Garbage- MAC Posh
Paradise
Mattene Swatches

The It Color- Swatch Series #4; Street Chic
and Rose


Oct 18, 2011

A new leopard design :)

Hey everybody!
I think you all know by now, that I love animal prints .. I can´t help it :P So here´s another manicure with leopard design :
I applied my base color, taped it off, added some metallic black and finished it by adding the leopard design. I used: Essence - White Hype (base), S-he 471 (silver), Essence - Fatal (leopard outlines) and Essence - Metal Battle.
Simple but eye-catching :P Some people actually asked to see my nails, so they could take a closer look :D 

Also ... it´s Tuesday! Yep, that´s right, you have the chance to tell me a number between 1 and 226, and decide which polish I wear tomorrow! :) Can´t wait to see, what it will be ;) 

Thanks for reading and have a great day! :-* 

Oct 17, 2011

Awesome Nail Mail!

Hey !!
Today I got a great surprise :D You know the giveaway from Paulina, I told you about? Well, I won those awesome polishes ;) Yeeey! :P Paulina also included 2 very nice postcards - btw you have a really cool handwriting :D I once commented on her blog that I like that one polish so much, and she included it in my package, because she sent it a little bit late. You didn´t had to do that but I was really, really surprised and happy about it :D Thank you so much for this great prize!
I was at the point, that I thought the package wouldn´t arrive anymore, and you know what ? The package arrived here almost one week ago, and my stupid post-man didn´t tell me! The post office sent me a notice, that they would send the package back if I don´t pick it up the next 2 days! Well, thanks for that! -.-
They also opened the package - it could have been explosive nail polish, who knows right? :D
And this is the content of the package :D Love it! Again - thanks Paulina! 
I will do swatches as soon as I have time...that means probably on the weekend :P 
Have a good night, my dear readers! :-* 

Oct 15, 2011

Nail Art Tutorial: Argyle Print

Hey, my dear readers!
Hope you are having a great weekend so far ;) Mine isn´t that good, cause I´m sick and I sit in bed all day, but that means I can do a little more for my blog ;) So here is another tutorial for you guys and it´s the Argyle print I showed you once on my Nail Art wheels :) Let´s start!

Step 1 : After applying your base coat and your base color, start off by painting diagonal lines all over your nail. The space between the lines will determinate the size of the argyle print, so paint more lines for a small print and fewer lines for a bigger print.


Step 2 : Now do the same thing from the other side ;) Little tip: If it´s hard to draw a continuous line, just start the line at the edge of your nail and draw it to the middle of the nail and then start from the opposite site and draw the line to the middle til they lines meet. Did that make any sense ? :P


Step 3 : Now that you have your net, you have to fill in some of the rhombs ( is that the correct word? I don´t trust google :D ) I did this with a small dotting tool, to make it a little easier. :) You already have a argyle print now! Let´s move on to decorate it a little bit more ;)

Step 4 : Now grab another color (preferable one that makes a contrast to the ones you used before) and draw some thin lines parallel to the ones you drew before. Hard to explain, but you get the idea from the picture ;)


Step 5 : Do the same thing from the other side :)  You could stop here and have an cool argyle print or you could take one more step ;)


Step 6 : As I said, this one is optional, but I like it very much :D In every spot, where the thin lines meet, you can add some rhinestones in the same color as the lines. Doesn´t it look awesome? :D


It takes some time to achieve this design, that´s why I did just an accent nail with it :) So here is the end result:
Do you like it ? I really hope this tutorial was helpful to some of you guys! :) I really like doing this tutorials and enjoy it even more, when I know I helped someone achieve the looks they wanted :)

Have a wonderful rest of the weekend and good night ! :-*

Oct 13, 2011

Reader´s Choice: Essence - Rock´n´Roll

Hello everybody! :)
I post this one day later than usual, cause yesterday I came home from the uni at 8 pm .. and I was exhausted :P
So! Sophie chose number 77 yesterday, and it´s Essence - Rock´n´Roll ! Thank you Sophie! This is one of my all time favorite polishes, because it´s just the perfect silver !
See what I mean ? Ah, I love it :D This is 2 coats, and application is usually good, but my bottle is almost empty and it was difficult to get the last drops of polish on the brush and onto the nails :P That´s why the polish made some bubbles, cause I brushed the polish over and over on the nail. I really had to little for a full manicure, but I made it ! I have it on now for two days, and there is no chipping so far :)
 With flash - it looks like chrome :D 
Essence discontinued this polish from their Multi Dimensions Line - why, WHY? How could you Essence ??
I was really sad when I saw that, but well, I have to search for another perfect silver now :P 

And the last picture was taken out of boredom :D I really love how long my nails are right now and in combination with the silver - aaaw! :D 
I love the metallic look! 
Do you like metallic polishes? Which one is your favorite? :)

Thanks for reading 
and have a good night! 
:-* 

Oct 11, 2011

Today´s Swatch: Farmasi 74

Hello! :) 
How are you all today? Good? That´s nice...yes I´m talking to myself here :P Soooo, I have another swatch for you, that I did some while ago and it´s not another blue polish! :D It´s Farmasi, Nr. 74, a really pretty purple polish. In the sunlight you can see purple, pink and blue shimmer, it´s really beautiful! Application was good, but I needed 3 coats to make it opaque ... that´s the only thing I don´t like about it. The more coats, the more likely it is to chip very soon. 
This picture isn´t the best, but there was no sun, when I took the pictures, so I experimented with the flashlight on my camera, to show you the shimmer! :) 
The last picture is the most color accurate. Do you own any Farmasi polishes? I don´t even know where that brand comes from, so if you know, you can tell me in your comments ;) 

And of course it´s time for you to tell me another number between 1 and 217 ! You can decide what polish I wear tomorrow ;) Thanks for that! :) 

Have a nice evening and see ya tomorrow ;) 

Oct 10, 2011

One Lovely Blog Award

Hello everybody :)
I received the "One Lovely Blog Award" from Laura, who you might know from Clothes, Cosmetics and Chat. I wanna thank you so much, Laura! It´s just so great to get such an award from you, because you´re one of my favorite bloggers :) So guys, if you don´t know her blog, I suggest you check it out right now! ;)
The rules for this award are: 
Link back to the blogger who gave you the award 
Share 7 facts about yourself
Share the award with 10 bloggers

Well, here are 7 facts about me: 
1.) I love watching storms ..  I can sit by my window for hours just looking at the rain and the lightning :) 

2.) I always wanted to be a marine biologist and swim with whales all day long for a living ;)

3.) I´m going to plant a pineapple this week :D 

4.) I love Pina Coladas ! 

5.) Doesn´t matter in what mood I am, once I´m in my car, driving and listening to loud music, life is perfect! Well, loud music always cheers me up :)

6.) I´m obsessed with Rihanna :D 

7.) Sometimes I feel like sleeping is a waste of time :P

I would like to pass the Award to this lovely Bloggers: 

You deserve it ladies ! :) 
See ya next time :-* 

Oct 9, 2011

Inspired by the Music Video - Rain over me -

Hello my dear readers!
How was your weekend? :) I don´t even know where the time went :P I didn´t even manage to do a tutorial for you :( Next Saturday I´ll do one again, I promise! Well, let´s move on to the nails! While I was doing some stuff around the house, I put my TV on UTV (a romanian music video channel) to listen to some music. The minute I heard "Rain over me" by Pitbull and Marc Anthony, I ran to the TV to turn up the volume :D I love that song and the music video is not that bad either ;) Here is a link to the youtube-clip! One of the girls had some really cool nails, that I had to try immediately. I took a screen shot, but the quality isn´t that great:
Click to enlarge to see the nails better ;) 
So obviously she wears some blue crackle polish :P As a base she has neon pink on all of her nails, except the middle finger, which has a neon green base. I would never have thought of this color combination , but I like it very much !
So, here are my inspired nails: 
 I used: Moyra - 64 1B1 (neon pink), Flormar - 50 (green) and Flormar - G01 (blue crackle). The blue crackle has a matte finish, just like every other crackle I tried so far. 
 After putting on some TC. See the pretty shimmer in the blue ? :) 
I like the end-result very, very much! What do you think ? :)
Good night and sweet dreams! See ya :-* 

Oct 6, 2011

Reader´s Choice: Essence - The World´s Coolest

Hello everybody!
As promised, here is the a swatch of the polish, that was chosen by Laura, who has 3 blogs, so I don´t know which one to link here, that´s why I´ll link you to her profile ;)  Thanks for choosing number 45! I think I never would have worn this polish (is that grammatically right?! - it sounds weird :D ), because it is sheer and it needs 3 coats to be opaque and it still could use one more coat. Anyway, it´s called "The World´s Coolest" from Essence´s Surfer Babe Limited Edition, and it´s a beautiful light blue. The application was a bit streaky but it was manageable.
The first pic is color accurate, but in the shadow it can look like in the second picture :) I just realized, that I wore blue/turquoise polishes for almost a week now. I have to put on some purple or red! :D
Well, that´s it, I have to get back to my first anatomy class now and I´m so excited, I love this subject! :D

Thanks for reading! Have a great day! :)

Oct 5, 2011

Late Nail Art Monday (Nr.8) - Give me the Blues

Hello, my lovelies! :)
Monday was ages ago, I know, but I wanted to post this Nail Art anyways, cause I really like it ;) The theme this week was: Give me the Blues! Basically you had to do some Nail Art, only using blue polishes. I used Essence - Shocking Blue as a base, it applied very easy and I realized I never wore this color before, because I didn´t like the way it looks in the bottle. How wrong I was! :D I like it very much, it´s just a really nice and calm blue...I don´t know another way to describe it :P
Then I added some dots all over the tips of my nails and the polishes I used, are: Essence - The World´s Coolest (light blue), Essence - I´m a Marine Girl (dark blue) and P2 - Gigantic.

Another simple but cute manicure! What do you think ? Do you like blue polishes? :) 
Have a good night ! See ya :*

P.S.: I´ll post the "Reader´s Choice"-post tomorrow ;) 

Oct 4, 2011

Beauty Blogazon Roundup 25.9 - 1.10


Enjoy this great posts ! ;)

Red Hair and Black Nail Polish  shows us Nails like Barbie with Catrice-Just married :)
 Nailfiled- Back (again) with The Face Shop GR502
Makeup Counter Confessions-Sanitation Please
Polish Insomniac shows us a Halloween Inspired Mani #1 -
Beauty.Mark Style & Fashion- New Updates-
From Mascara To Meatloaf - Apples & Brown Sugar in Phyllo Shells
Nails and Noms - Essie Winter 2011 Cocktail Bling Collection (swatches & review)
Glitter Gloss Garbage reviews Bath and Body Works Paris Amour
Addicted To All Things Pretty- Women Of Color Interactive Product Map 

See ya!  :-* 

Today´s Swatch: Essence Twins - Bella & Edward

Hello, my lovelies ! :)
First off: I didn´t forgot the Nail Art Monday, I will post it later or maybe tomorrow, but yesterday was my first day at the uni and it was really stressful -.- That´s why I won´t be able to post as much as usual, but only til I figure out how to allot my free time :)
Let´s move on to the polish(es): It´s the Essence Twins, Bella & Edward! I know a lot of you guys love those polishes, and let´s be honest: they´re just A-MA-ZING!! :D Both, the base color (Bella) and the Glitter Topper (Edward), are very easy to apply, and like almost every Essence polish, the greenish turquoise base color has a glossy finish. I just let the pictures speak for themselves ;)
See the beautiful glitter ?! I couldn´t stop staring at them in the sunlight :D
The Glitter Topper has normal, round glitter and square glitter in it, and that´s what makes it so beautiful ;) The last picture is the most color accurate :)

Oh, I almost forgot! Today´s Tuesday ! Tell me a number between 1 and 217, and as always, the first comment with a number counts! :)
Have a great and sunny day ! I´ll go back to the uni now :D


Oct 1, 2011

Nail Art Tutorial: Dots and Dots

Hello, my dear readers!
It´s Saturday and as usual, here is another tutorial for you :) I saw this design on youtube, so go and check out the video tutorial if you like ;)  It´s very easy to do, so let´s get started!


Step 1:  You will need a total of 3 color for this design, I used: Essence - You belong to me (base), Essence - White Hype and Essence - Trust in Fashion. After applying your base color, grab a small Nail Art brush and draw some lines with the other 2 colors. I can fit only 3 lines on my nail, but you can draw 4 lines if you want to :)


Step 2: Now grab a dotting tool and make some big dots along the lines. My white polish was a bit thick, so the dots aren´t that perfect and round as they should be :P While placing the dots, make sure to leave enough space between them, so that the dots on the other line can fit in the gaps :)


Step 3: We´re almost done! :) Just put some smaller dots inside the big ones, with the other color you used for the lines. Let it dry a bit and finish it off with a TC.


In the end it should look like this:
I hope it was helpful and let me know if you try it ! :) 
Have a great weekend! :-*