Jun 24, 2012

Holo Glitter Tips

Goooood Morning! :)

I'm back! Yay :D I have sooooooo much catching up to do! And I have a lot of posts to do, that I promised you guys, so I'll try my best ;) I have to confess that I had almost only naked nails the past few weeks, that's why I chose something easy and pretty to get back into polishing my nails :P


I applied a silver polish (Flormar 436) like a french tip and added 2 coats of Essence Hello Holo over it like a gradient. Then I finished it up with a TC and that's it! Quick and easy to do :) 


Sunlight pictures!! :D And a blurry one, to show you the holo awesomeness of Essence Hello Holo. 


It looks a 1000 times prettier in real life! It kinda reminds me of wedding nails =))

So what's new in the blogging world? :) Let me know!

Have a great Sunday, my lovelies! :* 

Jun 22, 2012

Guest Post by The Sneakerette !!

Heeeeey!

I'm very excited about today's guest post! :D It's written by the Sneakerette, one of the coolest bloggers out there!! When I discovered her blog, I was like  "A nail blogger who also loves Sneakers? Oh hell yea! ...OMG and cars too ?? I love her !!" =))) 
I absolutely love cars and I also had a time in my life where I only wore sneakers and I had them in all kinds of colors :D Well, I still love them ;) Soooo, if you don't know her, I really suggest you to visit her blog, Lacquers and Laces, and I'm sure you will love it! She has gorgeous nails  

----------------------------------------------------------------------------
Hello, dear readers of Red Hair and Black Nail Polish!
It's the Sneakerette over from Lacquers and Laces, and I'll be sharing a bit of my nail art with you today! (:

Have you ever gotten that super excited feeling when you meet someone who likes the same things as you? Well, that's how I felt when I discovered all the awesomeness that is behind Red Hair and Black Nail Polish! I mean, not only does Theodora run a sick nail blog--she's also a huge car enthusiast! And being the automotive lover that I am, I couldn't help but spaz a bit when I found out (: Oh and to top it off, she's also one of the most personable bloggers I've ever gotten to know 

When Theodora invited me to do a guest post on her blog, I knew instantly that I wanted to do a Ford Mustang inspired mani for her, because that's her favorite car of all time! I found out that her ideal paintjob would be lime green with matte black accents, so I went for that colorway, and created a look inspired by the body line, racing stripes, and of course, logo of the Ford Mustang!


 Hope y'all dig the design, and huge thanks to Theodora for having me!
----------------------------------------------------------------------------

I already told you, but ....AAAAAH!!!! This is soooo COOL !! Omg, I can't believe you did this design and look at that perfect mustang on your thumb!! I'm in love :D You really are amazing, girl! ;) I have to know what that lime green is :D I don't own a polish with that gorgeous color ...not yet anyway :P
And for you my dear followers, just in case you can't imagine a car with that crazy color, look at this, my future car: 


Isn't it awesome? 

Thank you so, sooo much for this guest post Eileen, you rock! :D
Now you, my lovely readers, go ahead and check out her blog ...and make sure to follow her!! 

Jun 18, 2012

Guest Post by Taya!

Hello! :) 
It's Monday and that means I have another guest post for you! I hope you all liked the guests so far and today I have a post written by Tatjana from Taya - My Little Beauty World. She always has gorgeous swatches and Nail Art and she is one of the friendliest bloggers out there! 
Let's see what she has prepared for us today!

-----------------------------------------------------------------------------
Hi, dear readers!

My name is Tatjana and I have a blog Taya - My Little Beauty World. First I want to thank Theodora for inviting me to write a guest post on her blog. She is amazing, I love her blog, nails and her nail art skills.

I was thinking for some time, what to do for this guest post and then I decided to do a gradient, which is very popular lately. Also Theodora did some amazing gradient and I thought, she's going to like it. Polishes, I used, are Flormar N002, Ruby Kisses Orange U Over?, Ruby Kisses Tropical Green and Depend 35. Because summer is coming, I used neon colors.


Then I was thinking to do some upgrade and I decided to use scotch tape. Before that I did only one scotch tape manicure, so my skills are not the best with it, but I wanted to do something special for Theodora's blog, something I don't usually do. The black polish is My Sparkling Acrobat from Circus Circus collection.


Thanks again Theodora for inviting me to write a blogpost for you. I hope you and your readers like my manicure.

Taya
-----------------------------------------------------------------------------

I loooove this gradient! So perfect for summer :D  The black stripes make it really cool! 
I haven't done a tape manicure in a very long time, I really should try one again :) 
Thank you so much, Tatjana, for doing this guest post for me and my readers!! 

So there you go, my lovelies! Leave a comment and then head over to her blog, to check out her other manicures!! 

See ya! :*

Jun 15, 2012

Guest Post by Kaki!

It's Friday!! Hooray! :D
Today's Guest Post is written by the awesome Kaki from Glitter Obsession! She's one of the coolest persons I got to know through the blogging-community and I consider her my friend ;) 
I can't wait to see what she will come up with, once we start our Summer Challenge, cause she always has great ideas!! :D Let's see what she prepared for us today: 

---------------------------------------------------------------------------
Hey everyone! I'm Kaki from GlitterObsession and I'm taking over Theodora's blog today! I was super excited when she asked if I'd come over for a day and hang out at her place, and I wanted to come up with something special because her pictures are always flawless and her nail art is amazing!

I chose to do a manicure based on a picture I saw recently on Let Them Have Polish. The 2nd from the right caught my eye and I thought, "Wow, that would look awesome on a nail!" That's a completely appropriate thing to think right?


So here is my interpretation:


These pictures do NOT do this mani justice. The glitter is so interesting with texture and depth and sparkles like stars. It was gorgeous!

Products Used:
  • Milani Nail Art Striper Polish in Black Sketch
  • e.l.f. Party Peach
  • LASplash Nail Art Glitter in Conjure
  • Painter's tape
  • Acetone/Brush
  • Seche Vite

I did use a black striper to give me a crisp line of black because I did the glitter first. I also did two coats of top coat after the glitter to smooth it out and to make sure I didn't drag glitter on to the black later.


And just for kicks, here are a few pictures of my trial runs on a nail wheel along with some other color combinations.

A different color combination. I liked it, but it didn't have the same sparkle and depth as using glitter. I used Color Club Jingle Jangle and China Glaze Snow Globe.
Another color combo. Reminds me of Superman. And the orange glitter in the blue makes it look like I was messy with the glitter. Live and learn.
Same color combo, but I did the black first, then the peach on top. Went on well, but the glitter is darker since it's over black polish, and I prefer the glitter to be brighter.
Rookie mistake. I did the orange and glitter first, then went over it with the black. Total texture nightmare. I couldn't smooth it out. Note to self: use glitter as the LAST layer and don't try to paint over it.


One more picture for kicks in the sun! Look at that sparkle!! I think what I love about this glitter for this look is that it has different sized glitter AND different colors so it will sparkle orange and green and gold, which makes it so much more interesting!

I hope ya'll liked what I showed today, and if you did, come on by my place at GlitterObsession and say hi! I'm very friendly, despite what Theo may say about me! O.^ 

Thanks for having me here today Theodora!! Good luck with your exams!
---------------------------------------------------------------------------

Haha, I didn't say one bad thing about you! My dear readers, believe me, she is very friendly and you really should go visit her blog :D  Thanks Kaki, I will need the luck! :D
And wow! I love the glitter and the mani looks just like the bathing suit! (or whatever it is :P) Look at all that sparkle! Thank you for showing us the other color combos as well :)

Thank you so, so much for doing this for me and I bet my readers love it, right? ;) Now, that you're done reading, you can go check out her blog and get some inspiration! 

Have a great weekend! 

Jun 14, 2012

Guest Post over @Clothes, Cosmetics and Chat !!

Hey there!
Just a quick post to let you know, that I did a guest post for Laura @Clothes, Cosmetics and Chat! Click --here-- top go directly to the post! And while you are there, make sure to follow Laura, if you don't do it already after her awesome guest post on my blog ;) 
See ya! :* 

Jun 11, 2012

Guest Post by Laura !

Hey there beautiful people! 
I have a few more guest posts for you, I hope you all don't mind ;) Btw thank you for keeping your fingers crossed for me, but I didn't pass the exam yesterday :( Oh well, I have another 4 coming up, so I just have to try to pass them all :P 
Today's guest blogger is Laura! She's the lovely lady behind the blog Clothes, Cosmetics and Chat and she has the best stamping manicures ever! She does awesome double stamped manis and her choice of colors is always sooo beautiful! I'm really glad to have her on my blog today ;) Let's see what she prepared for us! 
---------------------------------------------------------------------------

Hello lovely ladies,

I'm Laura from Clothes, Cosmetics and Chat and today the fabulous Theodora has asked me to write a guest post for you all. I'm always very inspired by Theodora's beautiful nail art but my free-handing skills need a lot of improvement so for my own manicures I tend to stick to stamping and today I'd like to show you a stamped manicure featuring Barry M Indigo as the base.


This photo shows two coats of Indigo but the colour is not at all accurate. My camera struggles to capture purples and Indigo is a lot more inky and purple-toned than these photos make it appear. 


My next step was to stamp a full sized nail image using image plate m79 and Barry M Special Effects Silver Foil nail polish. This polish is great for stamping, it never lets me down, and neither does that image plate. It's one of my favourites.


I then stamped two silver butterflies on each nail using plate m36.   


Usually when I double stamp, I use two different colours however, I struggled to think of any polishes in my collection that would be opaque enough to stamp over silver and blue so I decided to make my butterflies silver too. 


My final step was to sponge some Miss Sporty glitter on to the tips of my nails. This is the first time I've used that technique but I really like the effect it gives! I'm excited to use glitter tips for my future manicures too. 

I really hope you like this manicure girls and once again I'd like to thank Theodora for letting me show you it :-) 

Bye for now, 
Laura
  ---------------------------------------------------------------------------

Oh wooooow! Double-stamping + blue/purple + silver + glitter ? Oh my, you really know what I like :D It looks absolutely stunning! You did a great job, Laura!! Thank you so much for doing this great guest post for me, I'm sure my followers will love it too! ;) 

What did I tell you ? For more awesome manicures, head over to her blog and make sure to follow her ;) 

Have an awesome and sunny day! :* 

Jun 8, 2012

Guest Post by Jenni from Gold Speck Nails !

It's Friday! :D 
And I have another gorgeous guest post for you guys ;) Today Jenni from Gold Speck Nails is taking over my blog to show you one of her absolutely awesome manicures! How do I know it's awesome? Because all of her manicures are! Don't believe me?? Well then, go to her blog and check out her archive! :D But first read her guest post ;) 

--------------------------------------------------------------------------
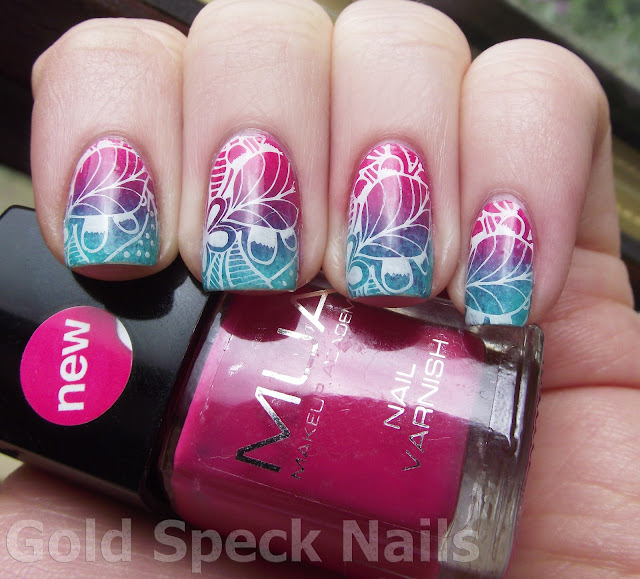
Hey everyone, I'm Jenni from Gold Speck Nails! Theodora's asked me to do a guest post, and I'm more than happy to oblige as she's very talented, and one of my favourite blogs to read :]

The skies had just started to clear when I started to paint my nails, so I was in the mood for something bright. I started with a base of white, and painted the pink and green on a sponge to get a gradient. Then I stamped with Dashica - Big SpD-A in Konad White, and added a top coat.

I really did not think that the pink and green would create such a gorgeous purple shade!

Here's what I used:
Base Coat: Nail RX - Stuck On You
Base Colour: Rimmel - Tip Whitener
Sponged Colours: MUA - Shade 20
                                  LA Colors - Atomic
Image Plate: Dashica Big SpD-A
Image Colour: Konad Special White
Top Coat: Models Own - 3 In 1

Thanks for having me :]
--------------------------------------------------------------------------

What did I tell you ?!! My gosh, this is soooo beautiful! I wish I could stamp that perfect, because then I would recreate this manicure immediately! The colors you used for the gradient are awesome! 
Thank you so much, for this great guest post and also a big thank you for doing a stamping mani! My readers don't get to see a lot of them on my blog =)) 

Now, that you read this post, go ahead and visit her blog! You won't be disappointed :) 

Have a great weekend ...and keep your fingers crossed for me on Sunday! 
(That's when I have my most difficult exam :/)
See ya! :* 

Jun 4, 2012

Guest Post by Cuti-CLUE-les

I had my first real exam today and it went pretty good! Yay, only 5 more to go ^^ Til I get some more free time, here is another fabulous guest post by Cuti-CLUE-les!! She is relatively new to the blogging world but she has such a talent!! Please, go visit her blog and click on some of her old posts to see what I mean ;) Enjoy her post!
------------------------------------------------------------------------------
Hey all!

After myself and Theodora decided to swap posts I was like "Crap, what do you do for a blogger with skills like Theodora?!". I came up with a few idea's but I wasn't really feeling them so naturally I went to her pinterest page to stalk her...umm I mean find inspiration ;) The first thing I noticed was her love for Rihanna so in I went and found this gorgeous dress and I knew it would make beautiful nail art!

Here is the picture I used for inspiration:

This is fairly easy to recreate but I did a little tutorial just to show ye how I did it :)

First off you will need a shimmery gold polish, a black nail art polish, a white nail art polish and a nude or flesh toned polish. You can use tape to create little sections if you don't have brushes but it might get a little fiddly painting over them and moving them about for the alternating colours. If you have black and white striping tape it will take you 2 seconds to recreate this :P

Here are the polishes I used:

1) I started off with a basecoat. I use stargazer 114 but it really doesn't matter what brand you use. Then I painted on two coats of Catrice Goldfinger (gold) leaving my ring finger blank for the time being.
2) When that was dry I used my nail art brush to paint a black stripe going diagonally across the nail.
3) Then right beside the black line I used my white nail art brush and painted on another diagonal line.
4) Above the black line I again used the white brush to add in another line. I started the manicure in the middle so it was all in proportion. If the middle lines are too far up on some nails it might take away from the end result :)
5) I added in another black stripe towards the base of the nail. I did this in a slight curve to imitate the curve of the body.
6) I followed on with another white line and that's it complete!
I repeated this process on all nails except for the ring finger.
On my ring finger I layered on two coats of Essence Nude it! You can see there are sections of sheer material in the dress where you can see Rihanna's skin and I thought it would work as a nice accent nail in the manicure.

I topped it all off with a coat of Essence quick dry topcoat just to prevent chips and make it a bit more glossy :D

It is so easy to do but it looks so pretty when it's done! It doesn't matter if all of your lines are the same as they are all different widths in the dress.

I really hope you all found this helpful and easy to follow! I'm so happy you let me post today Theodora and I want to say a massive thanks for all your help since I started blogging. Your a Star!!

Cuti-CLUE-les
------------------------------------------------------------------------------

I don't even know where to start!! :D It's so amazing that you looked for something I like in order to do some nail art based on it! I have to say you totally nailed it with this Rihanna inspired manicure! ;) And your nails look so stunning as well! 
Thank you sooo much Cuti-CLUE-les for this amazing post and I hope we will do another "post swap" in the future ;) 
Well then, what do you think? Isn't she totally awesome for including a tutorial as well??? =) 
Now that you finished reading this post, go ahead and read some more on her blog! Go!! :D 

Jun 1, 2012

Guest Post by Alexis!

Hey! :)
This month will be pretty busy for me, because I'll have all of my exams and that's why I asked some lovely ladies to guest post for me! First one today is Alexis from -xoxo Alexis Leigh! I'm so glad to have her on my blog, because she has some really beautiful nails and Nail Art and she also does tutorials!! Awesome right? Go check her out, you won't be disappointed! ;) Enough talk, let's see what she has prepared for us :) 

----------------------------------------------------------------------------
Hi everyone! I'm super excited to be doing this post for Theodora and a little bit nervous. It took me a while but I think I finally figured out a post that was worthy of you all! But, most importantly, thank you so, so, so much Theodora for allowing me to visit you on your wonderful blog! It was so much fun coming up with a post for you all and Theodora so I hope you all enjoy it! Okay, let's get started before I get carried away; that happens easily...

So, before we start let's go over tools need: White polish of your choice, flakie topcoat (optional), two different shades of blue polish (one lighter one dark), thin nail art brush/striper, a topcoat (preferably one that won't drag your design!), a piece of scrap paper or something similar to put the polish on, and any necessary tools for cleanup. Yay, let's get started!
Today I'm going to be showing you how to achieve a super hot nail art design, flames! It's pretty simple and looks awesome with basically any color scheme! I especially love the added flakie topcoat because it gives it so much more visual interest and dimension than a plain creme. It's also perfect for renewing your old mani since it covers tipwear although you could certainly do this design at your cuticles. Send me pictures, I'd love to see how it turns out! 
1. Paint your nails white, let dry, paint your nails with flakie topcoat, let dry, then, apply a fast dry topcoat.
2. Paint on a thin line (like a french tip!) with your light blue polish.
3. Now, using your striper, paint squiggly flame-looking designs of varying sizes.
4. Here, I've finished painting on the flames!
5. Now, this is where you'll need a steady hand! Put a drop of your dark polish on a piece of paper and using your striper, outline the flames. Quick tip, you'll want to use a light hand because it'll create a thinner line.

Simply apply your topcoat and you're finished! You can do this to all of your nails or leave it as an accent design. One of the reasons why I love this particular design is because it's great at lengthening the wear of your old mani!
Thanks again so much Theodora for having me and thank you, lovely readers for taking the time to read this! I appreciated every moment of it and now I don't want to say bye :( I think I'll just send you xs and os instead!

-xoxo Alexis Leigh
----------------------------------------------------------------------------

What did I tell you? She is great!! Thank you so much Alexis for this awesome post and the tutorial!! I'll definitely try this hot flames out soon! ;) If you want to see more Nail Art and tutorials go visit her blog and make sure to follow her ;) 

Have a great weekend, my lovelies! :*