
Hope you are having a great weekend so far ;) Mine isn´t that good, cause I´m sick and I sit in bed all day, but that means I can do a little more for my blog ;) So here is another tutorial for you guys and it´s the Argyle print I showed you once on my Nail Art wheels :) Let´s start!
Step 2 : Now do the same thing from the other side ;) Little tip: If it´s hard to draw a continuous line, just start the line at the edge of your nail and draw it to the middle of the nail and then start from the opposite site and draw the line to the middle til they lines meet. Did that make any sense ? :P
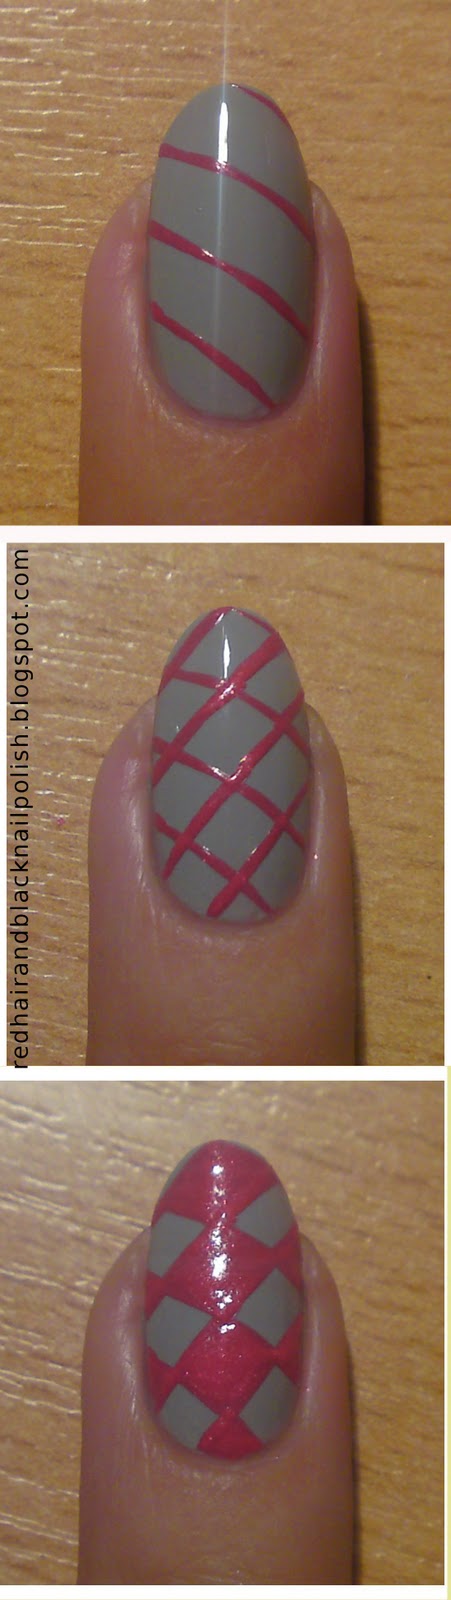
Step 3 : Now that you have your net, you have to fill in some of the rhombs ( is that the correct word? I don´t trust google :D ) I did this with a small dotting tool, to make it a little easier. :) You already have a argyle print now! Let´s move on to decorate it a little bit more ;)

Step 5 : Do the same thing from the other side :) You could stop here and have an cool argyle print or you could take one more step ;)
Step 6 : As I said, this one is optional, but I like it very much :D In every spot, where the thin lines meet, you can add some rhinestones in the same color as the lines. Doesn´t it look awesome? :D
It takes some time to achieve this design, that´s why I did just an accent nail with it :) So here is the end result:

Have a wonderful rest of the weekend and good night ! :-*
Yours kicks mines butt !!! hahaha love it !
ReplyDeleteCUUUUTE!! Hope you feel better, I feel your pain sorta, I'm not sick but I have killer allergies! Boo! I love the color combo on this too!
ReplyDeleteI love this :) I will definitely have to try it some day!
ReplyDelete@Mooni: Thank you°´! :))
ReplyDelete@Pinupcherrymakeup: Thank you so much! Allergies are so annoying, right? :)
@chicnight: Thank you! :)
Really cool! I'm totally pinning this to my nail board on Pinterest :)
ReplyDeleteOkay! This is awesome!
ReplyDeleteI love it! Thanks for the tutorial! I hope you feel better soon :-)
ReplyDelete@Sarah: Thank you! :D
ReplyDelete@imfeelingnail-venturous: Thank you so much ;)
@FrugallyMe: You´re welcome! And thank you ;)
This is a great tutorial and a fantastic look :-) I hope to try this in the near future! Just need to think about my colour combination.
ReplyDeleteHope you get well soon!
great tutorial, thanks. :)
ReplyDelete@ Laura: Thank you very much ! ;) >ou will get the idea for a good color combi ;)
ReplyDelete@Sandra : Thank you and you´re welcome ! :)
Very nice, thanks for the great tutorial!
ReplyDeleteThank you! I´m glad you like it ;)
ReplyDeleteThis is such an amazing tutorial. I can't wait to try it!
ReplyDeleteThank you! :)
ReplyDelete